Design to Code – Part 1: Breaking Down a Mockup into Sections
"The secret to turning design into code isn't in writing perfect syntax—it's in seeing the patterns that make websites work."
Ever opened a design file and felt your stomach drop? Maybe you're looking at a complex homepage design with animations, fancy layouts, and interactive elements—and your mind is racing with questions:
"How do I even start organizing this?""What should I build first?""How do I make sure I'm not missing anything important?"
You're not alone. That overwhelming feeling is something every developer faces, whether they're just starting out or have years of experience. The good news? There's a systematic way to break down any design into manageable, buildable pieces—and it's a skill you can learn.
In this first post of a short series, we’re going to do something most tutorials skip over—turn a visual design mockup into something code-ready. If you’re a developer handed a JPG, PDF, or Figma link and told, “Build this,” this is your roadmap.
We’re starting with the Homepage and About Page from the Amethyst mockup series.
🎯 What You'll Need
A design mockup (we'll use Amethyst, but you can follow along with any design)
Basic understanding of HTML and CSS
A code editor (VS Code, Sublime Text, or similar)

⚠️ Common Pitfalls to Watch For
Diving in too quickly: Resist the urge to start coding immediately
Missing mobile views: Always check if there are mobile/tablet versions of the design
Overlooking states: Remember to look for hover states, active states, and animations
Inconsistent naming: Start with a naming convention and stick to it

✨ Quick Wins Checklist
As you work through this tutorial, you'll hit these milestone moments:
⬜ Identifying all major sections of the page
⬜ Spotting repeated patterns
⬜ Creating your first HTML skeleton
⬜ Setting up your base styles

💡 Checkpoint: Before moving to each new section, make sure you can explain why you've grouped elements the way you have. If you can't explain it, revisit your structure.
🧱 Step 1: Look at the Page as a Whole
Here’s the Home Page Mockup (uploaded as 01_home.jpeg):
At first glance, this page is just a tall scroll of content. But zoom out and you’ll start to see natural section breaks:
Hero section with headline and call to action
About us / Features blocks
Portfolio preview / “Works”
Service icons
Testimonials
Stats & Facts
Team and Skills
Pricing Tables
Blog previews
Contact/Footer
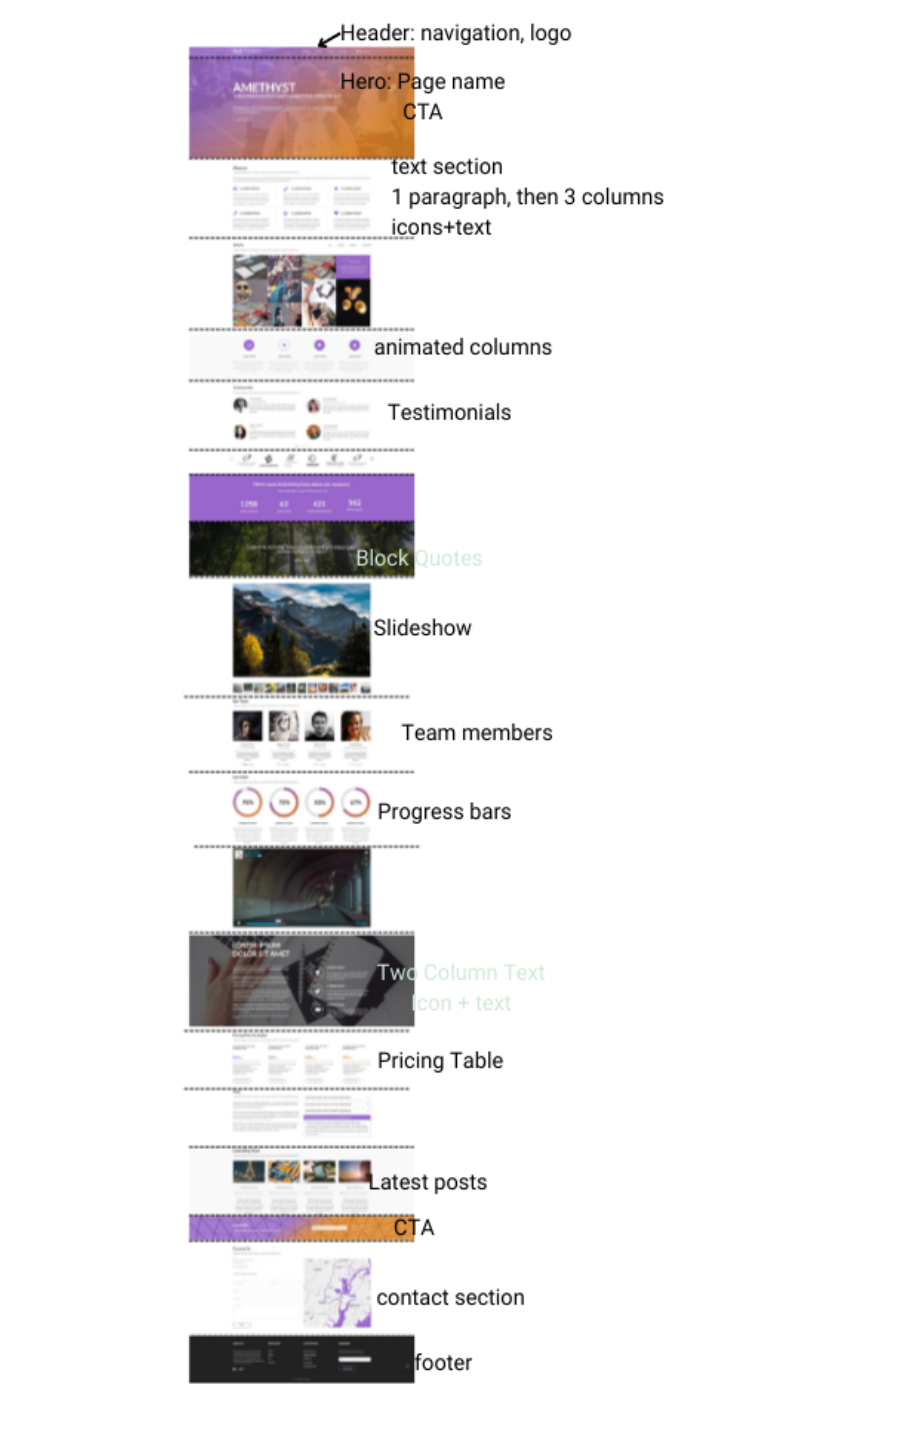
Each of these is a logical unit that will become its own section in code. These sections often mirror HTML5 semantic tags like <header>, <section>, <article>, <footer>.
💡 Checkpoint: Can you identify at least 5 major sections in your design? Try explaining your breakdown to someone else—if they understand it, you're on the right track!
🔁 Step 2: Identify Reusable Patterns
Look closely at any website, and you'll start noticing the same patterns showing up again and again. This isn't lazy design—it's smart development! Here's why this matters for you:
Think of these patterns like LEGO blocks. Once you build one piece well, you can reuse it anywhere:
Icon + Title + Text blocks → Build it once, use it in Services, Skills, and What We Do sections
Card Grids → Perfect it once, reuse for Works, Blog, and Team sections
Full-width CTA banners → Design one great banner, use it throughout
Testimonials / Quotes → Create one quote style, apply it everywhere
Why this makes your life easier:
🔨 Build once, use many times (less coding!)
🐛 Fix bugs in one place, fixes everywhere
🎨 Change styles site-wide with one update
⚡ Work faster as your pattern library grows
Whether you're using a framework like Vue/React or just plain HTML/CSS, organising your code into these reusable pieces will save you hours of work later. Start with simple classes or partials—you can always make them fancier as you learn more.
💡 Checkpoint: Look at your pattern list. For each one, can you find at least 2-3 places where it appears in the design? If not, it might not be a true pattern.
🔎 Example: Breaking Down the “About Company” Page
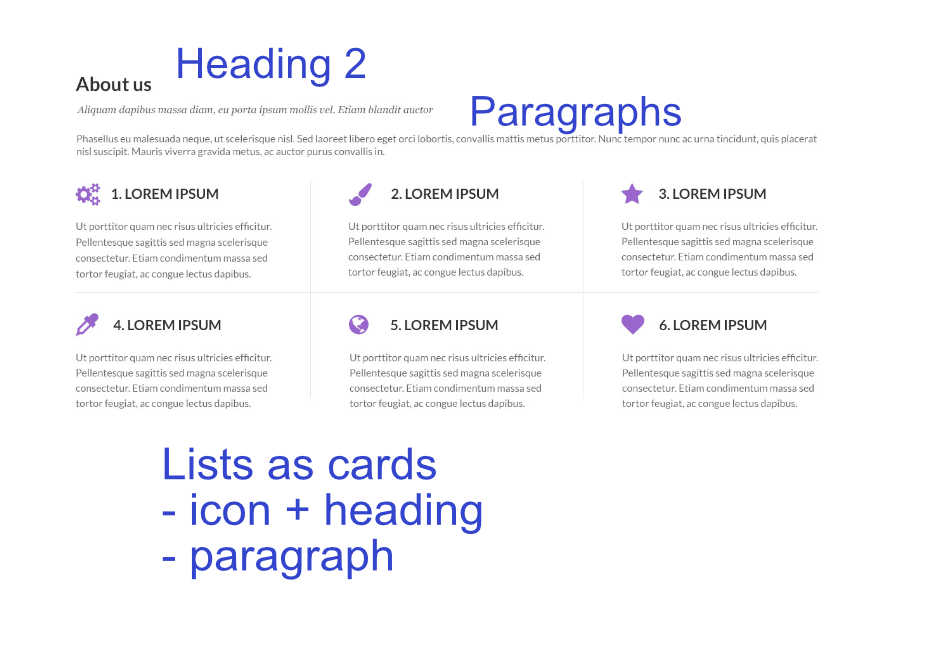
Now let’s look at 04_about_company.jpeg — the About Page mockup.
This page can be broken into the following:
Intro Section: Who We Are
Left-aligned text block with mission/vision/goals.
Cards Grid: Services
Three-column layout with title and CTA button.
Team Section
3–4 team member blocks with photos, titles, and links.
Skills Section
Circular progress indicators (likely svg, canvas, or CSS-only).
How We Work
Icons + short text (very similar to the homepage service layout).
FAQ Section
Accordion-style (requires interactive component)
Stats Bar
Numbers over purple background (call to action or just credibility)
Footer
These are not just static bits of design—they’re codeable chunks.
🧩 Step 3: Sketch Out the HTML Skeleton
Now comes the fun part—turning our visual sections into actual HTML structure. But before we dive into the code, let's talk about why we use specific HTML tags instead of just <div> everywhere:
Semantic HTML tells a story: Just like a book has chapters and paragraphs, your webpage needs a clear structure. Here's how we'll organise it:
When breaking down designs, thinking ahead about consistency pays off big time. Here's why it matters in the real world:
💨 Faster Development
Time-saving example: Need to add a new team member? With consistent card styles, it's a 5-minute job instead of an hour of rebuilding styles
Quick updates: Change your brand color in one CSS variable, watch it update across 50+ components instantly
🛠️ Easier Maintenance
Real scenario: Client wants all buttons rounded? With consistent components, it's one line of CSS instead of hunting through 20 different button styles
Bug fixing: Found a spacing issue in your card layout? Fix it once, fixes everywhere that card pattern is used
👥 Better User Experience
Navigation: Users learn your interface faster when buttons, links, and cards behave consistently
Brand trust: Consistent design elements (like that specific shade of blue in your CTAs) build recognition and trust
📱 Responsive Design Wins
Mobile-friendly: Consistent spacing units make responsive designs work smoothly across all screens
Performance: Reusing styles means less CSS to load, faster page speeds
Start by identifying:
Core patterns: What elements keep showing up? (buttons, cards, spacing units)
Global styles: What should be consistent everywhere? (colours, typography, grid systems)
Component variations: Where do you need flexibility while maintaining consistency?
Pro tip: Document these decisions in a simple style guide—future you will thank you!
💡 Checkpoint: Before moving on, create a simple style guide document listing your core patterns, global styles, and component variations. This will be your reference as you build.
🛠️ What’s Next?
In Part 2, we’ll take one of these sections (likely the Team or Skills area) and code it from scratch, from HTML structure to responsive CSS layout. We’ll also look at using utility classes, CSS variables, and reusable design tokens.
💬 Want to Follow Along?
You can download the same mockups we used here (just shout if you want a link), or follow along with your own designs.
Ready to level up?
Join The Graphite Journal Newsletter for web development insights beyond just code.
Stay Ahead of Web Development Trends
Join our newsletter and receive:
- Monthly development tips & tricks
- In-depth tutorials and guides
- Early access to new content