Black Swan Bistro - Part 5
Prepare for Deployment
Turn the finished bistro project into a production-ready site by checking files, links, images, metadata, accessibility, and final browser behaviour before it goes live.
From Finished Locally to Ready for Visitors
In the earlier Black Swan Bistro lessons, you built the site piece by piece: first structure, then layout, then reusable patterns, then multiple pages, then a polish pass.
At this point, the bistro site may look finished on your own computer. That is a strong milestone, but it is not the same as being ready for production. A production site has to load from a server, work on other devices, explain itself clearly in browser tabs and search previews, and avoid the small file-path mistakes that local testing can hide.
This lesson is the calm pre-launch pass. You are not adding a new feature. You are checking that the work you already did can survive the move from your computer to the web.
- What could go wrong when a site moves from your computer to a live server?
- Which parts of your bistro project would you want to double-check before sharing it with someone else?
- How would a written checklist change the feeling of deployment?
This lesson follows the Part 4 multi-page build and Part 4B polish pass. It prepares the project for Part 6, where you will publish the bistro site.
Learning Objectives
By the end of this lesson, you'll be able to:
- Explain Explain what production readiness means for a static website
- Audit a project folder before deployment
- Test navigation, CSS, JavaScript, and image paths across a multi-page site
- Prepare images with sensible filenames, sizes, and alt text
- Add page-specific titles and meta descriptions
- Run a final browser, mobile, and console review before publishing
Why This Matters:
Deployment becomes much easier when the project is already clean, understandable, and tested. This lesson gives you a repeatable launch-readiness process you can use on every static site you build.
Before You Start:
You should be familiar with:
- BSB Part 4: Multi-page Site Review here
- BSB Part 4B: Polish and Refine Review here
- Deployment Fundamentals Review here
What Production Readiness Means
Production is the version of a site that real visitors use. It might live on a hosting service, behind a custom domain, or on a temporary preview URL while you test. Either way, it is outside your own computer.
That change matters because a browser loading files from a server is less forgiving than a learner testing one page locally. A missing capital letter in an image filename, an old draft file, or a vague page title may not feel urgent during development. Before deployment, those details become part of the visitor experience.
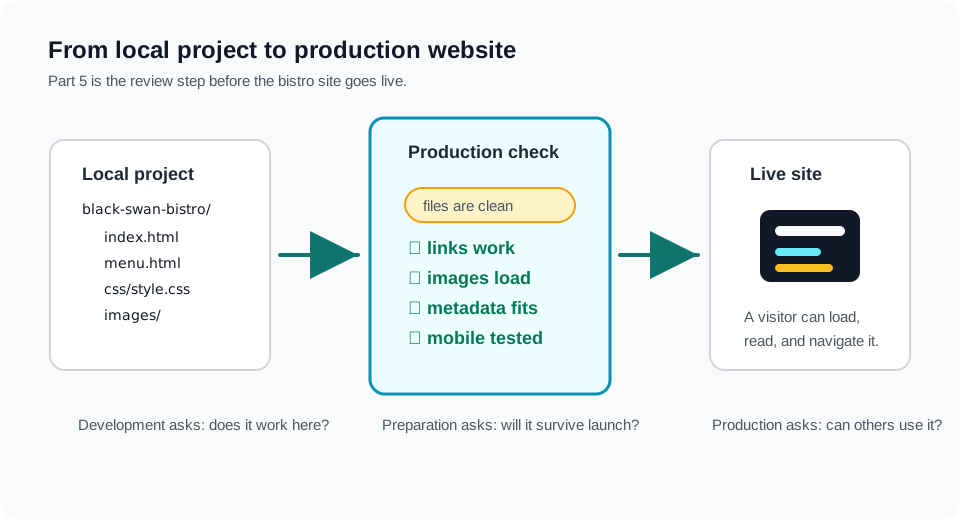
Key idea: deployment is not only a technical step. It is also a review step. You are checking that the site is understandable, portable, accessible, and ready to be used by someone who did not build it.
Audit the Project Folder
Start with the project folder because every deployment method depends on it. If the folder contains old drafts, confusing names, or unused files, deployment becomes harder to reason about. A clean folder makes it obvious which files belong online.
Your bistro project should now have a simple shape:
black-swan-bistro/
  index.html
  menu.html
  about.html
  contact.html
  css/
    style.css
  images/
  js/
It is fine if your exact image names differ, but the main idea should be clear: HTML pages at the project root, shared CSS in the css folder, and images in the images folder.
Folder audit questions
- Can you tell which file is the homepage?
- Are the four main pages named consistently?
- Are filenames lowercase and readable?
- Are old drafts or duplicate files outside the deployment folder?
- Can someone else open the folder and understand where the CSS and images live?
Check Links and Paths
Static websites rely on paths. A path tells the browser where to find another page, a CSS file, an image, or a script. In a multi-page site, copied paths are one of the most common sources of deployment bugs.
For Black Swan Bistro, every page sits at the same level, so the navigation paths can stay simple:
<nav class="site-nav">
  <a class="site-nav__link" href="index.html">Home</a>
  <a class="site-nav__link" href="menu.html">Menu</a>
  <a class="site-nav__link" href="about.html">About</a>
  <a class="site-nav__link" href="contact.html">Contact</a>
</nav>
Check paths by clicking like a visitor, not just by reading the code. Open each page and move through the navigation from there. If you only test from the homepage, you may miss a broken link on another page.
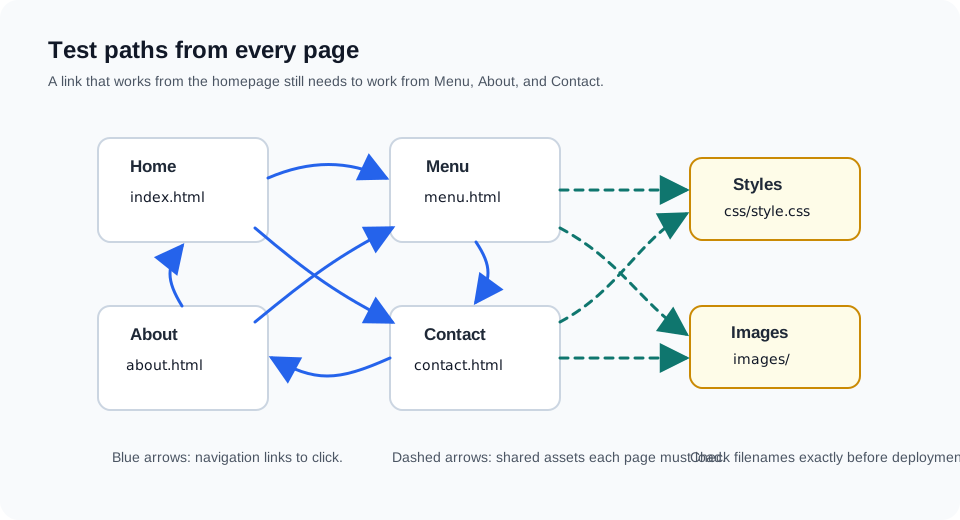
Watch for case sensitivity: some servers treat bistro-front.jpg and Bistro-Front.jpg as different files. Match filenames exactly.
Prepare Images for the Real Web
Images often cause the biggest performance problem on small static sites. A beautiful restaurant photo can easily be several megabytes if it came straight from a camera or stock library. That may work on your laptop, but it can feel slow on a mobile connection.
Before deployment, review every image and ask:
- Is the image still used on the site?
- Is the filename readable and lowercase?
- Is the file size reasonable for the way the image appears?
- Does the
alttext explain the image when it has meaning? - Is the image decorative, informative, or part of navigation?
<img
  src="images/bistro-dining-room.jpg"
  alt="Warm dining room inside Black Swan Bistro with tables set for dinner"
>
Good image preparation is not only about speed. It also supports accessibility and trust. A restaurant site with broken images or vague alt text feels unfinished, even if the layout is technically correct.
Add Production Metadata
Metadata lives in the <head> of each HTML page. Visitors do not always see it directly in the page content, but browsers, search previews, bookmarks, and sharing tools use it to understand the page.
Each page should have its own title and description:
<head>
  <meta charset="UTF-8">
  <meta name="viewport" content="width=device-width, initial-scale=1.0">
  <meta
    name="description"
    content="Explore seasonal starters, mains, desserts, and drinks at Black Swan Bistro."
  >
  <title>Menu - Black Swan Bistro</title>
  <link rel="stylesheet" href="css/style.css">
</head>
The description should be honest and specific. It does not need to sound like advertising. A clear summary is more useful than a dramatic one.
| Page | Example title | Description focus |
|---|---|---|
index.html | Black Swan Bistro | Restaurant overview and main invitation |
menu.html | Menu - Black Swan Bistro | Food, drinks, and seasonal dishes |
about.html | About - Black Swan Bistro | Story, values, and team context |
contact.html | Contact - Black Swan Bistro | Opening hours, address, and enquiries |
Run an Accessibility and Usability Pass
Accessibility is part of production readiness because visitors do not all use the web in the same way. Some people use keyboards, screen readers, zoom, high contrast settings, or reduced motion preferences. A small site should still respect those needs.
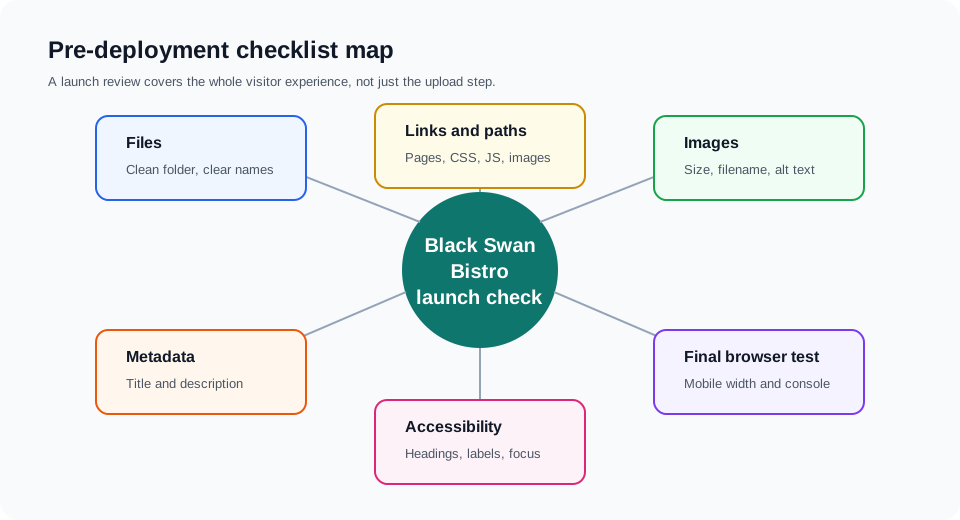
Structure
- One clear
<h1>per page - Headings move in a logical order
- Main content sits inside
<main>
Interaction
- Links and buttons can be reached by keyboard
- Focus states are visible
- Hover effects are not the only signal
Content
- Link text is descriptive
- Forms have labels
- Images have useful alt text where needed
Final Browser Check
The last check should feel practical. Open the site and behave like a visitor who has never seen the code. Move through the pages, resize the browser, check the contact details, and look for anything that feels broken, unfinished, or confusing.
Pre-deployment review
- Homepage loads with CSS and images
- Menu, About, and Contact pages open from every page
- Active navigation state matches the current page
- Images are not broken and have appropriate alt text
- Page titles and descriptions are specific
- Layout works at a narrow mobile width
- Contact links, email links, or form placeholders make sense
- Browser console has no unexpected errors
If something fails, that is useful information. Fix it, retest it, and update your checklist. Production readiness is not about never finding problems. It is about finding them before the site is public.
Checkpoint: Can You Explain Launch Readiness?
Before you prepare the final checklist, answer these in your own words.
- Why is a site that works locally not automatically ready for production?
- What is the safest way to check navigation before deployment?
- Why should each page have its own title and meta description?
- What should you do if your final audit finds a small issue?
Tips to Remember:
- Think like a visitor, not only like the person who wrote the code.
- Paths, metadata, images, accessibility, and browser checks all support the same goal: a reliable live site.
- A checklist is a professional habit, not busywork.
Check Your Answers
- A local site can hide problems that appear on a server: case-sensitive filenames, missing assets, broken relative paths, slow images, unclear metadata, mobile layout issues, and pages that were not tested from a visitor point of view.
- Open each page in the browser and click every navigation link from every page. A link that works from index.html may still be wrong from menu.html, about.html, or contact.html if the path was copied incorrectly.
- The title helps visitors, browser tabs, bookmarks, and search results identify the page. The meta description gives a short, useful summary of the page content instead of leaving the browser or search engine to guess.
- Fix it, test the specific page again, then repeat the relevant part of the checklist. The point of the audit is not to prove the site is perfect on the first pass; it is to catch issues before visitors do.
How confident are you with this concept?
Still confused | Getting there | Got it | Could explain it to a friend
Guided Practice: Prepare Black Swan Bistro for Deployment
Work through the bistro project one review pass at a time. Keep your checklist open while you test.
Create a deployment checklist
Inside your black-swan-bistro project folder, create a file called deployment-checklist.md. This is not part of the website visitors will see. It is your working record of what you checked before launch.
# Black Swan Bistro Deployment Checklist

## Files
- [ ] No unused draft files are in the project root
- [ ] File and folder names are lowercase and predictable

## Links
- [ ] Navigation works from every page
- [ ] Images load on every page
- [ ] CSS loads on every page

## Production review
- [ ] Page titles are specific
- [ ] Meta descriptions are useful
- [ ] Site works on a narrow mobile viewport
- [ ] Browser console has no unexpected errors
Need a hint?
Audit the project folder
Look at the root of the project folder. You should expect the main pages and asset folders to be easy to recognise:
black-swan-bistro/
  index.html
  menu.html
  about.html
  contact.html
  css/
    style.css
  images/
  js/
Remove unused duplicates such as index-copy.html, old-style.css, or draft images you no longer use. If you are unsure, move questionable files into a temporary holding folder outside the project before deleting anything.
Need a hint?
Test every link and asset path
Open index.html in the browser. Click through to menu.html, about.html, and contact.html. Then repeat from each page.
While you test, watch for three clues: a page that does not open, an image that shows as broken, or a page that suddenly loses its CSS. Each clue usually points to a path problem.
Need a hint?
Prepare images for visitors
Open each bistro page and list every image it uses. For each one, check four things:
- The filename is lowercase and descriptive, such as
bistro-dining-room.jpg - The file is not far larger than the size it appears on the page
- The
alttext describes the meaningful content - The image supports the page instead of acting as filler
If an image is decorative only, use an empty alt attribute: alt="". If it communicates real content, write useful alt text.
Need a hint?
Add production metadata
Open the <head> of each HTML page. Confirm each page has a specific title and a short description:
<title>Menu - Black Swan Bistro</title>
<meta
  name="description"
  content="Explore the seasonal menu at Black Swan Bistro, including starters, mains, desserts, and drinks."
>
Keep descriptions plain and useful. They should describe the page, not oversell it.
Need a hint?
Run the final visitor test
Use the site like a first-time visitor. Do not read the code first. Open the homepage, move through the navigation, resize the browser to a narrow mobile width, and check that the contact page still makes sense.
Then open DevTools and check the Console. If you see an error, write it in your checklist before fixing it. The habit of recording issues will help you debug calmly later.
Need a hint?
You're on track if you can:
- Your project folder contains only the files needed for the site
- Navigation works from every page
- CSS and images load correctly on every page
- Each page has a specific title and meta description
- You tested the site at a narrow mobile width
- You recorded any issues and fixes in a checklist
Independent Practice: Write the Launch Notes
Now turn your audit into a short launch-readiness record.
Create a production-readiness note
Add a short section to deployment-checklist.md called Launch Notes. Summarise what you checked, what you fixed, and what you still want to review immediately after deployment.
Requirements:
- Record the date of your pre-deployment review
- List at least three checks that passed
- List at least one issue you fixed or one risk you considered
- Write the live-site checks you will repeat after deployment
- Keep the note practical enough that another learner could understand your process
Stretch Goals (Optional):
- Add basic Open Graph metadata for one page and explain what it does
- Run a Lighthouse audit in Chrome DevTools and record one improvement idea
- Compare your checklist with the general deployment checklist from the deployment fundamentals lesson
Success Criteria:
| Criteria | You've succeeded if... |
|---|---|
| Folder and files | The project folder is clean and the required pages/assets are easy to identify. |
| Testing | The notes show evidence that navigation, images, CSS, mobile layout, and the console were checked. |
| Production judgement | The notes explain not just what changed, but why the change matters before deployment. |
Recap
In this lesson, you prepared Black Swan Bistro for deployment without rushing straight to a hosting dashboard. That is the point. A production-ready project is easier to publish because its files are clean, its links are tested, its images are sensible, its metadata is specific, and its visitor experience has been reviewed.
You now have a checklist that belongs to the project. In Part 6, that checklist becomes your safety net when you push the site to a hosting service and test the live URL.
Part 5 Complete: Your Bistro Is Launch-Ready
Key Takeaways:
- Production readiness is the step between "it works on my computer" and "a real visitor can use it".
- A clean project folder makes deployment less fragile because there are fewer confusing files and paths.
- Relative paths, image filenames, and navigation links should be tested from every page, not only from the homepage.
- Image preparation protects performance and accessibility at the same time.
- Titles and meta descriptions help people, browser tabs, bookmarks, and search previews understand each page.
- A written checklist turns deployment from a stressful guess into a repeatable workflow.
Learning Objectives Review:
Look back at what you set out to learn. Can you now:
- Explain what production readiness means for a static website Check!
- Audit a project folder before deployment Got it!
- Test navigation, CSS, JavaScript, and image paths across a multi-page site Can explain it!
- Prepare images with sensible filenames, sizes, and alt text Could teach this!
- Add page-specific titles and meta descriptions Check!
- Run a final browser, mobile, and console review before publishing Got it!
If you can confidently answer "yes" to most of these, you're ready to move on!
Think & Reflect:
Project Confidence
- Which part of your project folder felt clearest after the audit?
- Which file or path issue would have been easiest to miss without a checklist?
Visitor View
- What changed when you reviewed the site as a visitor instead of as the person who built it?
- Which page needs the most improvement before you would be comfortable sharing the live URL?
Launch Readiness
- What evidence tells you the bistro site is ready to deploy?
- What would you want to recheck immediately after the site goes live?
Real-World Test:
Professional teams use pre-launch checks for the same reason you used one here: deployment exposes small mistakes quickly. A calm checklist protects the project, the client, and the person doing the launch.
Looking Ahead:
Next, you will move into Black Swan Bistro Part 6 and deploy the site. Keep your checklist close. After the site is live, you will run many of the same checks again against the real URL.
Additional Resources
- web.dev: Learn Performance - practical guidance for making pages load faster.
- MDN: Metadata in HTML - a clear explanation of what belongs in the document head.
- Chrome Lighthouse overview - a useful audit tool after you understand what it is checking.
Recommended Next Steps
Continue Learning
Ready to move forward? Continue with the next tutorial in this series:
Black Swan Bistro — Part 6 (Deploy the Site)Related Topics
Explore these related tutorials to expand your knowledge:
Additional Resources
Deepen your understanding with these helpful resources:
- web.dev: Learn Performance - Practical guidance for making production pages faster and easier to use.
- MDN: Metadata in HTML - A clear explanation of title, description, viewport, and other head metadata.
- Chrome Lighthouse overview - Use Lighthouse as a final review tool after you understand what it is checking.