Breaking Layouts into Sections
Divide a full-page design into header, hero, content sections, and footer.
Structure Before Styling
Once you understand a design and its patterns, the next question is: how should this page be organised in HTML?
This is where section thinking matters. A clear page structure makes your code easier to write, style, debug, and explain to other people.
When you skip this step, layouts often become messy because the HTML never had a strong plan to begin with.
- Have you ever started styling a page and realised your HTML structure no longer made sense?
- Do you sometimes create too many divs because the page plan is not clear yet?
- What would make a homepage skeleton feel easier to build?
This lesson turns layout thinking into a rough HTML plan so later CSS work has something stable to build on.
Learning Objectives
By the end of this lesson, you'll be able to:
- Divide a design into major page regions before styling
- Use semantic HTML sections in a practical way
- Know the difference between a full section and a repeated block inside a section
- Create Create a starter page skeleton that is ready for layout work
Why This Matters:
If layout thinking is the mental model, section planning is the practical bridge into code. This step makes the page buildable.
Before You Start:
You should be familiar with:
- How to Think About Layouts Review here
- How to Read a Design Review here
Why Sections Matter
A page section is a meaningful chunk of the page, not just any visible box. Good sectioning helps you answer questions like:
- What are the major parts of this page?
- Where does one purpose end and another begin?
- Which headings belong together?
- Which areas should be link targets from the navigation?
Start with the Main Page Regions
Many pages can begin with a simple top-level structure:
<body>
  <header>...</header>
  <main>
    <section>...</section>
    <section>...</section>
    <section>...</section>
  </main>
  <footer>...</footer>
</body>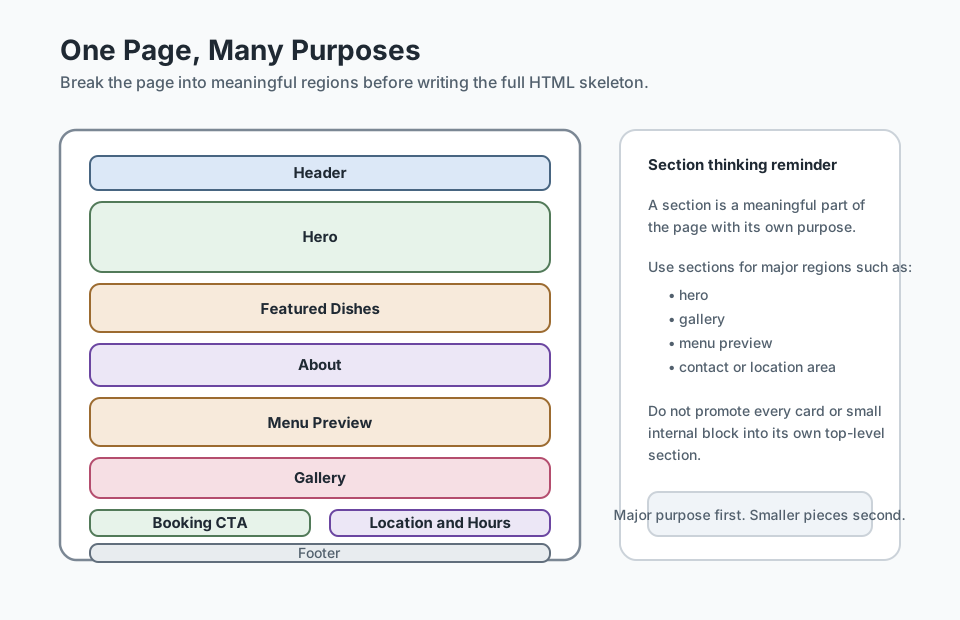
This does not finish the page for you, but it gives the design a stable frame.
Checkpoint for Understanding
Pause here and check whether you can distinguish page regions from smaller internal blocks.
- Why is it a mistake to turn every visible box on a page into its own top-level section?
- What job does a rough HTML skeleton do before any real styling begins?
- Predict what happens if you start styling before the section plan makes sense.
Show sample answers
- Because it usually produces messy HTML and hides the difference between major page purposes and smaller repeated blocks inside those purposes.
- It gives the page a stable semantic structure that later CSS can build on more clearly and consistently.
- Layout decisions become more fragile because the CSS is trying to compensate for unclear structure instead of building on a solid HTML foundation.
How confident are you with this concept?
Still confused | Getting there | Got it | Could explain it to a friend
Black Swan Bistro Example
If we take a homepage like Black Swan Bistro, a sensible section breakdown might look like this:
- Header with logo and navigation
- Hero section
- Featured dishes section
- About section
- Menu preview section
- Gallery section
- Booking call-to-action section
- Location and opening hours section
- Footer
That is already enough to start building a semantic homepage skeleton before any real styling happens.
Write the HTML Skeleton
Once you know the sections, write a rough structure with clear placeholders. It does not need final text yet.
<body>
  <header>
    <!-- logo and nav -->
  </header>

  <main>
    <section id="hero">
      <!-- main headline and intro -->
    </section>

    <section id="featured-dishes">
      <!-- repeated dish cards -->
    </section>

    <section id="about">
      <!-- about content -->
    </section>

    <section id="menu-preview">
      <!-- repeated menu blocks -->
    </section>
  </main>

  <footer>
    <!-- footer links and contact details -->
  </footer>
</body>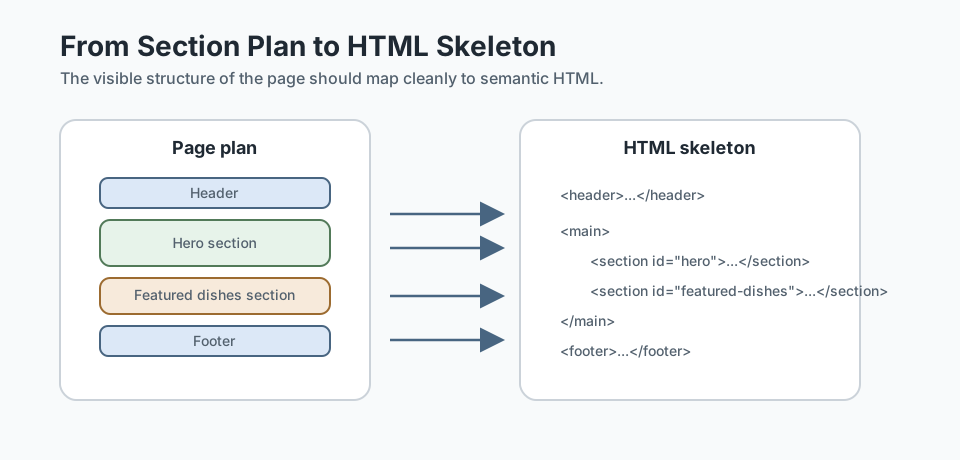
Know the Difference Between Sections and Blocks
One of the easiest mistakes is turning every visible item into a top-level section. That usually creates messy HTML.
- A hero area may be a section.
- Each card inside that section is usually not another top-level section.
- A gallery may be a section.
- Each image tile inside the gallery is usually a smaller internal block.
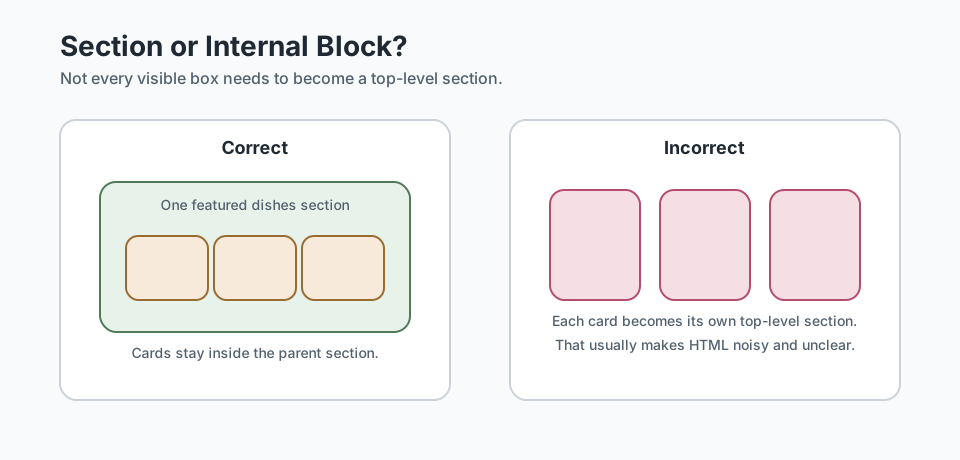
Think in layers: major purpose first, smaller content pieces second.
What to Check Before You Start Styling
- Does each major area of the page have a clear purpose?
- Do section headings make sense in order?
- Are repeated blocks grouped inside the right parent section?
- Would another developer understand the page structure by reading the HTML?
Important: if the HTML skeleton feels unclear, styling usually gets harder very quickly. It is worth slowing down here.
Guided Practice
Turn a page into a semantic skeleton
Use the lesson process to move from visible page regions to a simple HTML plan before styling begins.
Step 1: List the major page regions
Pick a homepage design or content plan and write down its biggest meaningful regions first: header, hero, feature area, about section, footer, and so on.
Your goal is to separate major page purposes before thinking about smaller internal pieces.
Need a hint?
Step 2: Build a rough HTML skeleton
Translate those page regions into a simple semantic outline using header, main, section, and footer.
Use comments or placeholders instead of writing final copy.
Need a hint?
Step 3: Separate sections from smaller blocks
Review your skeleton and mark which pieces are true top-level sections and which are smaller repeated blocks inside them, such as cards, tiles, or link groups.
Adjust the structure if you accidentally promoted too many internal blocks to top-level regions.
Need a hint?
You are on track if you can:
- You identified the major page regions before writing detailed HTML
- You translated the page into a simple semantic skeleton
- You kept repeated internal blocks inside the correct parent sections
- You can explain why this structure would make later CSS easier
Independent Practice
Independent Practice: Section-plan a fresh page
Now apply the same structure-first approach to a different page without step-by-step help.
Your Task:
Choose a different homepage or landing page and create a rough semantic HTML skeleton for it. Focus on the major regions, then decide which smaller pieces belong inside those sections as repeated blocks.
Do not style it yet. The goal is a clean structure plan you could build from later.
Requirements:
- Identify the main page regions first
- Write a simple semantic skeleton using header, main, section, and footer where appropriate
- Separate top-level sections from smaller repeated blocks
- Add a short note explaining why the structure would support later CSS work
Stretch Goals (Optional):
- Add IDs to sections you expect navigation links to target
- Mark one repeated block that might later become a reusable component or shared CSS pattern
Success Criteria:
| Criteria | You've succeeded if... |
|---|---|
| Section planning | The learner identifies sensible top-level sections based on page purpose rather than surface appearance. |
| Semantic skeleton | The HTML outline uses clear semantic regions and is readable before styling exists. |
| Sections vs blocks | Repeated internal pieces are not confused with top-level page regions. |
| Build readiness | The final structure feels stable enough that later layout and styling work would have a clear foundation. |
Additional Resources
If you want more support for the ideas in this lesson, these are especially useful:
- Every Layout - particularly valuable for thinking about page sections as compositional layout structures rather than page-specific hacks.
- BEM - Block Element Modifier - helpful once you start naming the page regions and repeated blocks in a clear, predictable way.
Recap
Breaking layouts into sections is the step that turns a design into code-ready structure. Once the HTML skeleton is sensible, later layout work becomes much easier, because your CSS is building on a page that already makes sense.
Lesson Complete: Your Layout Can Now Become HTML
Key Takeaways:
- Sections turn a visual design into an HTML plan that is easier to build and maintain.
- Not every visible part of a page needs to be its own top-level section.
- Semantic page regions make styling, navigation, and accessibility clearer.
- Good section planning makes later CSS work faster and less fragile.
Learning Objectives Review:
Look back at what you set out to learn. Can you now:
- Break a full-page design into sensible semantic regions Check!
- Write a rough HTML skeleton before styling the page Got it!
- Distinguish between page sections and smaller repeated content blocks Can explain it!
- Prepare a page structure that supports later layout and reuse Could teach this!
If you can confidently answer "yes" to most of these, you're ready to move on!
Think & Reflect:
Structure Choices
- Did you create too many sections the first time you tried this?
- Which areas of a page feel like major regions and which feel like smaller internal groups?
Code Readiness
- How does a clear skeleton reduce confusion once you start writing HTML?
- What part of your page structure is likely to stay stable even if the design evolves later?
Looking Ahead:
Recommended Next Steps
Continue Learning
Ready to move forward? Continue with the next tutorial in this series:
Black Swan Bistro (BSB) Part 2: Build the Homepage Wireframe Layout with CSSRelated Topics
Explore these related tutorials to expand your knowledge:
Additional Resources
Deepen your understanding with these helpful resources:
- Every Layout - A strong reference for thinking about sections and composition as reusable patterns.
- BEM — Block Element Modifier - Useful when naming page regions and repeated blocks in a predictable way.